

Up to this point, most of my metal castings have been unimpressive blobs, because I spent the majority of my time trying to figure out how to reliably reach the melting point of metals and how to make the process quicker. This left me with little time to find a better material to use as a mold.
Another obstacle to producing intentional shapes was the fact that I did not have materials that are conventionally used as a mold, such as graphite, Petrobond, or wet sand, which is commonly called green sand. The reasons why I don’t have these materials yet are thatgraphite requires a method of milling or grinding the desired shape into the graphite, Petrobond is expensive and smoky, and I simply don’t have access to high quality silica sand and bentonite clay for green sand at this moment. I will likely buy sand and clay at some point, but I haven’t done it yet and I am also trying to keep the costs of this project as low as possible.
Improvised Molds
Because of this lack of a decent mold, it was necessary for me to improvise. I had an early success with a piece of gypsum from drywall during the first metal cast I had ever attempted. I used a hole saw to cut out the circumference of my coin shape, then I carefully chiseled out the interior of the shape until the face of the coin was flush with the groove of the circumference which I had previously carved, making sure that the face of the coin was as smooth as I could make it with a chisel. I finished the mold by carving my desired inscription and the current year into it using a steel nail. This simple mold worked decently well for lead, but because the melting point of aluminum is about twice that of lead, aluminum caused my gypsum molds to deteriorate rapidly and release steam which caused the molten metal to dangerously bubble and splatter. The bubbling caused the metal’s shape to be irregular and the surface of the aluminum was corroded from reacting with the steam. To add to these challenges, I also realized that if I did not heat the aluminum enough, then it was too viscous to cast with fine details, but if I heated the aluminum too much, then it would easily react with oxygen in the air and form a film of oxides which further distorted the image that I intended to cast.


I attempted to resolve this issue by using mud as a mold, since there is silica in the dirt I used as well as plenty of clay. That mud mold suffered from many of the same issues that the gypsum mold suffered from, so I decided to try just sand, however, the sand that I used was apparently full of dust, leaves, and other organic material, therefore once the molten metal contacted the sand, smoke and flames began to rise off of the sand, which again ruined the cast, besides the fact that the large grain size of the sand left the metal with a rough texture.
What are organic materials?
In chemistry, organic materials, which can sometimes be called organics, are organic molecules or structures made from organic molecules. Organic molecules are molecules made from carbon which is usually arranged in long chains of carbon that is covalently bonded to itself and hydrogen atoms, but organic molecules can also bond to other nonmetals. Organic molecules typically originate from living organisms. Organic molecules typically will not have metals within their structure, though some organometallic molecules do exist, such as hemoglobin.


After all of these issues, I abandoned the idea of casting metal and I simply dropped blobs of metal onto a flat piece of steel that was laying around, which did produce decently shiny blobs.

The First Cubes
Eventually, I had the idea to return to the mud molds, but this time, I used a sort of tamper that was in the shape of a cube attached to a handle. I carefully carved this new tool out of wood using a handsaw, a file, and sandpaper; I actually carved it out of a branch that was laying outside my home. To make the mold, I firmly pressed the tamper into some mud that was as dry as possible without being so dry that it would crumble; I found that it helped to also squeeze the mud around the tamper to make sure that the mud pressed against all surfaces of the tamper.

I would definitely not recommend casting metal using this method, since it is dangerous. The moisture in the mud does boil and it can cause the metal to splatter and launch droplets of molten metal at you; this has happened to me a couple times. If you do decide to try this, be sure to wear safety glasses, gloves, and something to cover your arms and legs. It would also be best to use a face shield and to stay upwind of the metal. If you decide to melt lead, then definitely stay upwind of it, have plenty of ventilation, and wear an appropriate mask to protect you from the lead vapors.
Once the tamper was pressed into the mud, I carefully pulled the tamper out of the mud, leaving behind a void in the shape of my cube. I also found that it helps to press the tamper into the mud just a little beyond the point at which the entire shape is within the mud, this way the mud is left with a small well above the void, which is called a riser. The riser will hold a little extra metal so that when the metal cools and shrinks, the casting below the riser will pull metal from the riser rather than forming an indentation. Just keep in mind that the larger the riser is where it connects to your casting, the more time you will have to spend cutting it off your casting; I spent roughly 15 minutes sawing my crude riser off of each cube I cast. If I had used a proper green sand mold with a narrow cylinder of metal connecting the riser to the casting, I should have been able to clip the riser off with a wire cutter.


I found it worked best to wrap the cube in a piece of cloth to protect it and then clamp it down in a vise so that you can cut the riser off with a metal saw. If the jaw plates on your vise have grooves that make it difficult to grip onto the cube, you could always use a flat piece of wood between the jaw plates and the cube.

After I cut off the riser, I used a metal file to grind all six sides down until they were flat and mostly free of indentations. After this, I used a piece of fine grit sandpaper and lightly sanded each side in a single direction to give the cube a smoother finish, which ended up looking like brushed metal. Remember: always wear a mask and have plenty of ventilation when cutting or sanding materials because fine dust is very unhealthy to breathe, especially when it is dust from metals and toxic materials. I would never recommend sanding down lead due to the toxicity of lead; I will likely never sand down another lead cube; even the one cube that I did sand down is not done perfectly, since I wasn’t interested in spending lots of time making lead dust.


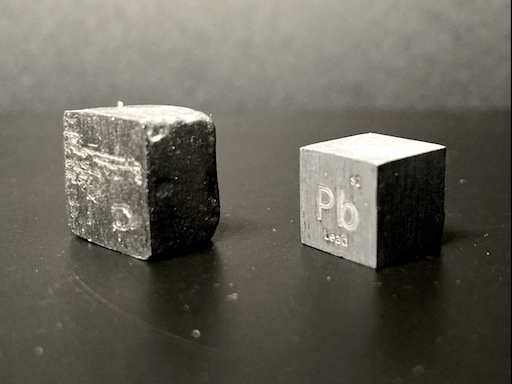
They are by no means perfect, but I am happy with my first cubes. I decided to compare them to the cubes from Luciteria; my aluminum cube was only 1.4 grams heavier than the one from Luciteria, but my rough, lead cube was a full 7.3 grams heavier than the lead cube from Luciteria. I actually like the finish I put onto my aluminum cube better than that of the Luciteria aluminum cube, but Luciteria is much better at the shapes and sizes of their cubes than I currently am at mine.

I did also attempt to cast a cube from another element, however, this one is not actually a metal. I had some sulfur laying around from another project, so I did my research to check the melting point, flash point, and toxicity of sulfur, and then I decided that I could pull it off.
The Sulfur Cube
I learned that the melting point of sulfur is only 235ºF, but you have to be very careful because the auto ignition point of sulfur is around 400ºF, which means if you accidentally heat the sulfur to that point, it will start burning; that is a narrow window between melting and burning; you also cannot put a flame directly onto sulfur because it will burn. Sulfur will attack some metals including copper, silver, and mercury, but it will also react with damp steel. There is also the huge danger of burning sulfur to consider; when sulfur burns, it has a pale, blue flame, which is almost impossible to see in the daylight. The gas that sulfur gives off when it burns, sulfur dioxide, is very poisonous and it can be fatal at high enough concentrations. If you need to put out a sulfur fire, you should use a fine mist of water or a firefighting foam; do not use a solid stream of water to extinguish sulfur fires, since agitating the surface of burning sulfur may disperse sulfur dust which could ignite and explode.
For these reasons, I placed the sulfur in an aluminum can and set the aluminum can into sand which I had in a steel can. I heated the steel can carefully with a propane torch, which heated the sand, which evenly heated the aluminum can with the sulfur; the sand was a kind of buffer to prevent small pockets of sulfur from reaching the flash point which would have set the entire can on fire.
Thankfully, none of the sulfur burned and I was left with a can of liquid sulfur, which I quickly poured into my mold and then I watched it cool, staying far enough away to avoid most of the foul sulfur smell.

I’ll admit that my sulfur cube is ugly. This is because the sulfur I used is only 90% sulfur with 10% bentonite clay, making the sulfur tan rather than bright yellow. I left the edges mostly untouched because I didn’t want to risk chipping or shattering the cube, even though I believe it is more durable than that. This cube also has a giant indentation because I greatly underestimated how much the sulfur would shrink when cooling, however, there appears to be tiny, needle like crystals inside the indentation, which is pretty cool.

This was probably the most tense experience I have had while attempting to cast a material, because of the extreme risks; I’m not likely to revisit sulfur casting, unless I get my hands on more pure sulfur; I do already know of a better source of pure sulfur, so we’ll see.
During my metallurgy adventures, I have melted and cast a lot of metal, but this nonmetal which I have cast does not fit in the category of metallurgy. Perhaps I could coin a term for this new category: nonmetallurgy.
Is there a metal, or nonmetal, that I should attempt to cast as a cube?
